Seiten

30. März 2013

Root Vegetable Salad with Pink Dressing


I am in love with all kinds of spices. Especially cinnamon. I use to add it to all kinds of dishes, savory as well as sweet. This, of course, isn’t my invention. Asian and African cultures have a huge variety of spice mixtures and dishes that contain cinnamon.
I am not really a person with a sweet tooth. I always prefer a salty pretzel to a piece of cake. May be it is the combination of both sweet and savory that makes my heart jump with delight when eating Moroccan or any other Oriental dish.
I dare not say this salad is Moroccan. It is just inspired by the warm, earthy flavor of a North African dish I had at a restaurant a while ago. It also originated from my love for couscous studded with golden raisins, apricots and a decent dose of warming spices and chili.
The salad can be served warm or cold and comes together in the blink of an eye since the oven is doing most of the work.
You just have to cut the veggies, throw them on a baking pan, mix the dressing.
Done.

I added umeboshi paste to the dressing because I think the tart and salty flavor of the plum compliments the sweetness of the root vegetables nicely. The healing  powers of the plum are also very appealing (aids digestion, combats fatigue and is claimed to protect against aging) and make it an great addition to any salad dressing or sauce.


Ingredients (Serves 2):

750g root vegetables (I used  half carrots, half parsley root; parsnips would be great, too)
½-1 tsp ground cinnamon
Salt and freshly ground black pepper to taste

Dressing:
Juice of 1/2 blood orange (2-3 Tbsp)
3 Tbsp lemon juice
1 Tbsp olive oil
¼ tsp umeboshi paste
1 tsp honey (optional)
Freshly ground black pepper to taste

¼ cup toasted hazelnuts, crushed
½ bunch of parsley, chopped
Fresh ginger, grated (optional)

Preheat oven to 175°C (350°F).
Peel vegetables and slice into long but thin sticks.
Put on a lined baking sheet and season with salt, pepper and cinnamon.
Bake at 175°C for 20-25 minutes until the edges start to brown and the veggies have softened but still are a bit crunchy.
While the veggies are baking, prepare the dressing.
Add all ingredients to a bowl and mix. Using a handheld blender, blend dressing to emulsify.

When the vegetables are done, add dressing and stir thoroughly to combine. Use your hands to not crush the veggie sticks!

Just before serving drizzle vegetables with additional dressing, add toasted hazelnuts and parsley, stir to combine.
Serve the salad on a bed of your favorite grain.


28. März 2013

Chocolate Peanut Butter Crunch-Balls and a Happy Easter!


Pssst. It’s me. The Easter Rabbit. I bring you handmade Easter Crunch-Balls this year. Excited? You better should. Because these Crunch-Balls have peanut butter in them.
Nobody can resist the smell and taste of peanut butter, right?!
Pair it with chocolate and we have unbelievable good things going on with your taste buds. Oh yeah.

I have been a bit short of healthy treats for a while now  and the peanut butter jar had been emptied weeks ago. I do not know how things like that happen.
But I stop moaning now because the times of peanut butter shortness in my house are over! And I made the best Easter treats a boyfriend could ask for. And if not, I will be there for a rescue. Trust me, those won’t last long when I am around.
I really have a close relationship to peanut butter and let’s not talk about chocolate here. Let’s just say they are good buddies you can rely on when in a baking rut.
Life is also pretty amazing this time of the year, think of crocuses shooting out of nowhere, making the still wintery scenery looking so alive. It always amazes me how strong and stubborn those little guys are. Their yellow and purple blossoms make me smile and excited for summer.
Since life outside is getting back to life, so do we. And to not ruin your energy levels and overall health with  a sugar overload around Easter, go make these Crunch-Balls for yourself or your loved ones. They are indulgent and filling at the same time, thanks to the nut butter, almonds and dried fruit. Healthy portion of fiber anyone?
If you are not as big of a peanut butter fan as I am, or simply want to replace it by a “more “ nutritious nut butter go ahead! I guess every other butter will be equally delicious.


Ingredients (Makes 12 balls):

½ cup (75g) almonds, divided
½ cup (80g) dried, pitted dates
¼ cup (70g) creamy peanut butter (mine was salted)
Seeds of 1/2 vanilla bean
1 Tbsp liquid sweetener (I used “Apfelsüße”, e.g. apple syrup)

85g good quality dark chocolate, melted
1 tsp coconut oil

In a food processor, process almonds until crumbly. Remove and set aside.
Add dates to the food processor and process until a sticky ball forms. Keep on processing while adding peanut butter, vanilla, ¼ cup (30g) of the ground almonds, and 1 Tbsp liquid sweetener.
Mix until well combined.
Roll dough into small balls and put into the fridge for 15 minutes.
In the meantime melt chocolate with 1 tsp coconut oil.
Coat the balls with chocolate and put into the fridge for approx. 10 minutes. The chocolate should have slightly hardend but not completely. Roll balls in the remaining ground almonds for garnish.
Store balls in the fridge.


                                                                  Happy Easter to you all!

27. März 2013

Date-studded Mini Brownies


New foods always amaze me. They actually make me behave like a three-year-old that just got the doll she ever wanted to have so badly. Oh well. I think there is nothing I freak out about more than new foods. First time I had oatmilk? Total freakout because it tasted like heaven. First time I had kale? Did a happy dance in front of the stove. Burned the kale while doing it. That's me.
What makes me wonder sometimes, is the way we change over the years. Our bodys, mind, feelings, cravings, tastes. They all change.
I often find myself raving about certain foods and at the same time my mind says: "Stopp. Didn't you use to hate that?" Me:" I guess you are right, mind." We talk about dates here.
Not blind-dates or coffee-dates with your best friend. Dates. The fruit. This wrinkled, purple, (tofu-)sausage-shaped fruit that sneeks into many oriental dishes and creates the wonderful honey-like sweetness that brings the dish to the next level. 
At least that's what I am thinking now. A few yeras ago I was having dates for the first time around Christmas
. In Germany dried fruits are very popular around Christmas. Baked as bread, covered in chocolate...I always prefered the bread version. Dates on their own just tasted way too sweet for my liking. But since I have been diagnosed with some kind of a sugar intolerance, I try to avoid sugar as much as possible. And what does a sugar-graving gal like me do when the desire for soemthing sweet hits? Go and have some dates.
Contrary to my opinion a few years ago, I now adore dates and every dried fruit on the planet. I even might be keen enough to say that dates are my favorite.
There flesh is soft with a melt-in-your-mouth consistency. When chewing the dates properly, they develop a lovely honey flavour that is just too good to be true!
They make a perfect mid-afternoon snack and are versatile enough to become your best baking friend.
This is the first recipe I have ever used dates in and I think it worked out fabulous.If you prefer other dried fruits feel free to replace the dates with any fruit you prefer. Maybe leave a comment to let us know how it worked out!
These brownies are alomst raw, but I am by no means an expert. I used regular cacao, but if you replace it by raw cacao (so expensive, ooohh), they should suit a raw vegan diet.
Serve with a cold glass of oat milk and enjoy as an indulgent but epowering snack all week long.
I promise that you won't miss the real thing. These brownies make a perfect healthy alternative to their sugar-and-butter-loaded siblings.


Ingredients (Makes10 Mini-Brownies):

1 cup sunflower seeds
½ vanilla bean
1 ½ cup soft, pitted dates
2-3 Tbsp cacao powder, more for garnish
Pinch Fleur de Sel or sea salt
A big handful of walnuts, roughly chopped

Process the sunflower seeds until finely ground. Use a food processor or Vitamix.
Add salt, cacao and the vanilla seeds and pulse to combine.
Keep on processing while adding the dates until a crumbly dough forms. The dough should be sticky enough to hold together when pressed together with two fingers. If it is still to crumbly, add more dates until you reach desired consistency.
Fold in walnuts with a spoon.
Spread dough into a small rectangle paking pan (approx. 10x20cm). Don’t forget to line the pan with a piece of parchment paper!
Place into the fridge for at least 1 hour and garnish with additional cacao powder before serving. Cut into 10 small pieces and enjoy!

Store in the fridge for up to a week.

25. März 2013

Feel-Good-Broth - Pho inspired


I use to eat special foods the day before an exam. In high-school I wore "lucky-underpants", but now I am definitely too old and mature for crazy  polka-dotted underpants. I mean, eating a certain food that is supposed to have magical power is much more appropriate for a 25-year-old, right? Cough.
Oh well, let’s face it: I am a freak when it comes to exams. I totally stress out the day before, crying, screaming, feeling sick. You name it. Two days before the exam migrain strikes and  makes my head feel as if an elephant was doing a step-dance in it. Not a good feeling I can tell you!
I’ll admit, I am probably a little emotional.


To make the evening before the exam as pleasant as possible, I treat myself with good food.
I am that kind of person who rewardst herself for…wait…not having done a thing? Uhm, yes. Don’t judge, please. I am a defender of treats. I think that we don’t treat ourselves enough. Special gifts caress the soul and make our lives worth living. So pat yourself on the shoulder once a day because you are awesome!
Alright, enough said. Let’s return to the main character of the show: The Pho.
As I have already told you, I have rituals before I take an exam. This time, I had soup.
Pho chai to be exact. It was the first Vietnamese food I had in my life and it was love at first bite. Or slurp. Pho is a soup after all.
The evening before this term's first exam was a very cold one. It was snowing like crazy, my shoes were wet and I could not walk fast enough to make my body warm up. I knew that today would be the day for my personal “lucky-soup”. I called my boyfriend and told him, that I had to have Pho chai today otherwise I wouldn’t be able to wright that damn exam because by then I had either died of the cold or of hysteric hyperventilation.  
He agreed on Pho Chai.
When I entered this beloved little restaurant that had evoked the love for Pho in me, I knew, everything was going to be ok. I ordered a kombucha (they serve it in wine glasses with sliced oranges and ice cubes, so fancy) and waited for my love to arrive.
And then we had Pho Chai. The second time in a week. 

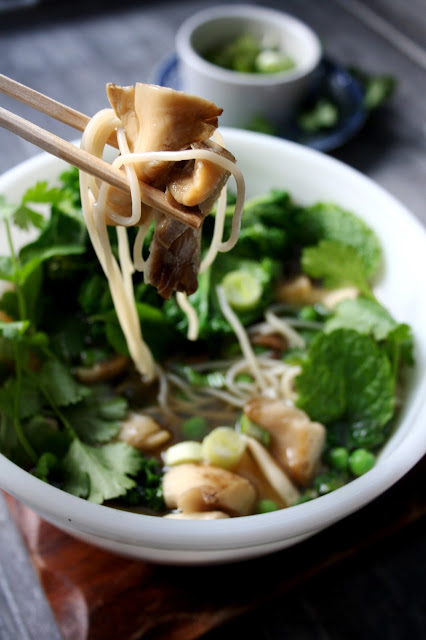
I have to say that it is the most comforting food I had in a very long time. The broth is so flavorful, with just the right amount of spices. I have no idea, what they put into their broth (no glutamate!) but it tastes a-maz-ing! The Pho is actually quite simple: fried silken tofu, corn, oyster mushrooms, rice noodles and herbs. Lots of fresh cilantro, mint, Thai basil, and green onions.
The herbs are served in a little basket together with bean sprouts. The broth comes in a tea pot and they pour the steaming deliciousness over the noodles right before your eyes.


One could say, that this soup is nothing special. The ingredients may be simple, yes, but they are so fresh and flavorful that the soup taste like heaven and I cannot stop raving about it!
The only draw back: I am not so good at eating the soup like a lady. But who cares. My t-shirt  says thank you.


As always, I had to try to make this broth at home. The restaurant is cute and cosy and all, but it is also a little expansive. Since I do not want money to rule my food world, I created a soup at  home that’s delicious enough to serve as an alternative. Like I've said, I have no idea, what original Pho is made of. And I was also too shy to ask the waitress at the restaurant for teh ingredients. Buh.
But the broth I cam up with is so delicious that I had to share it with you anyways. No matter if I call it feel-good-broth, it was definitely Pho-inspired.


The recipe makes enough for 2-3 people and you can get creative with the add-ins. I followed the green theme and it tasted great, but feel free to add any vegetables you like.
For a very simple and light snack, just have a cup of the broth. I think it tastes best on its own and I will totally make it again when the cold strikes again.

P.S.: Sadly, I cannot tell if this soup really is a "lucky-soup". I am still waiting for the results of my exam but it definitely helped my buzzing head calm down. No headache the next day. Yay!


Ingredients (Serves 2-3):


6 cups water (1.5 litre)
knob coconut oil
2 large or 4 small garlic cloves, crushed*
2 stalks lemongrass, crushed*

1 bird’s eye chill3 cm ginger root, peeled
1 large sweet onion, cut into 8 pieces
2 carrots, coarsely chopped into 2 cm pieces
2 parsley roots, coarsely chopped into 2 cm pieces
3 Tbsp soy sauce
1 tsp fleur de sel or coarse sea salt, more to taste

Add-ins:Noodles of choice (rice, soba or spelt) to serve 2-3 people
1 cup peas, cooked
250g Oyster mushrooms, sliced and pan fried, seasoned with salt and pepper
Chopped greens, slightly sautéed and seasoned

Mint leaves
Cilantro/coriander leaves
Thai basil (did not have any, but tastes great!)
Scallions, chopped

In a large pot heat coconut oil. Add in garlic cloves, lemongrass, chilli, onion and ginger and roast for about a minute in medium heat. Then add carrots and parley root. Mix well until the vegetables are coated with coconut oil. Deglaze with soy sauce and water. Bring soup to a boil and simmer on very low for 1 hour. Remove from heat and leave covered for one more hour. Using a fine strainer, drain the broth to remove the vegetables and seasoning. Add salt or soy sauce to taste. Reheat slightly for serving.

Cook noodles of choice accoring to package directions, drain and place into bowls.
Arrange noodle bowls with vegetables and herbs of your choice, cover all with broth and serve hot!
Serve with more fresh herbs.

*Tipp: I did not mince the garlic and lemongrass.  I just crushed the cloves and the white part of the lemongrass with a rolling pin. Works great and makes straining easier!


22. März 2013

Breakfast Millet Bowl


In recent years breakfast has become the most important meal of the day for me.
It keeps me sane. And because it is this important for me, I get up 2 hours before I have to leave the house only to have enough time to celebrate this part of the day. Stress in the morning can ruin my day. Seriously. There is nothing worse than shuffling down your oatmeal in 1 minute, drink your cup of tea in one gulp, and rush out the door to catch the train. So exhausting!You see, I am more of a slow eater and drinker when it comes to the early part of the day. I need my rituals to feel cozy and relaxed. I think I am lucky that I am an early bird and don’t mind getting up early. Priorities guys, priorities.
Most days I have oatmeal with some kind of fruit and nut butter for breakfast.
But once in a while a little change does not hurt either.
Welcome the bloved Breakfast Millet Bowl. It is a yummy alternative for those who are sensitive to gluten and those who want to integrate more grains into their lives. One serving of whole grains for breakfast? Yes please.
To add some spice, I normally throw in a cinnamon stick and/or one star anise. For the warmer months I prefer vanilla or lemon, but since it is still freezing outside, I used cinnamon and anise today.
The recipe below makes enough millet to serve three people but also keeps well in the fridge for a few days. I prefer to cook a whole batch and just reheat it the next day with a splash of milk.

Millet is one my favorite whole grains of all times. Really. I adore its nutty flavor and the creaminess when cooked. To make it even better, millet contains its fair share of iron, protein and B-vitamins. Vegetarian super food, yeah!
And now get up and make yourself a nutritious, filling and most importantly, delicious breakfast you want to share with your loved ones.
Dress up your bowl with sliced, seasonal fruits, fruit compote, nuts or a drizzle of maple syrup. Sprinkle with coconut and enjoy!

 
Ingredients:
(Serves 3)

1 cup millet, washed
2 cups unsweetened plant milk (I used oat milk)
½ -1 cup water, depending on how creamy you want the millet to be
1 cinnamon stick
Handful raisins
2 Tbsp shredded coconut

Wash millet with warm water and add into a small pot.
Add raisins, cinnamon stick, anise star and coconut flakes in a small pot and cover with milk and 1/2 cup water. Bring to a boil and simmer on low for 10 minutes, or until liquid is almost completely absorbed. Remove from heat and let sit for 5 minutes. The millet should be creamy and soft. If you like it more soft, stir in more water until the desired consistency is reached.
Serve with fresh fruit, my favorites are mango, pineapple, and blood oranges.
Leftovers reheat well. Just add a splash of milk or water and heat through.